The room is finally quiet. You press the power button on the remote, and a wash of soft, warm ambient light floods the space behind your television or along the crown molding. It feels clean, modern, and perfectly tailored. You step back, admiring how a simple peel-and-stick roll transformed the entire atmosphere of your living room in under ten minutes.
But beneath that modern glow, an invisible, destructive chemical reaction is silently taking place. You trust these lights because they are cool to the touch. The industry taught you that low-heat diodes are inherently safe for any surface, completely removing the fire hazards associated with older halogen or incandescent bulbs.
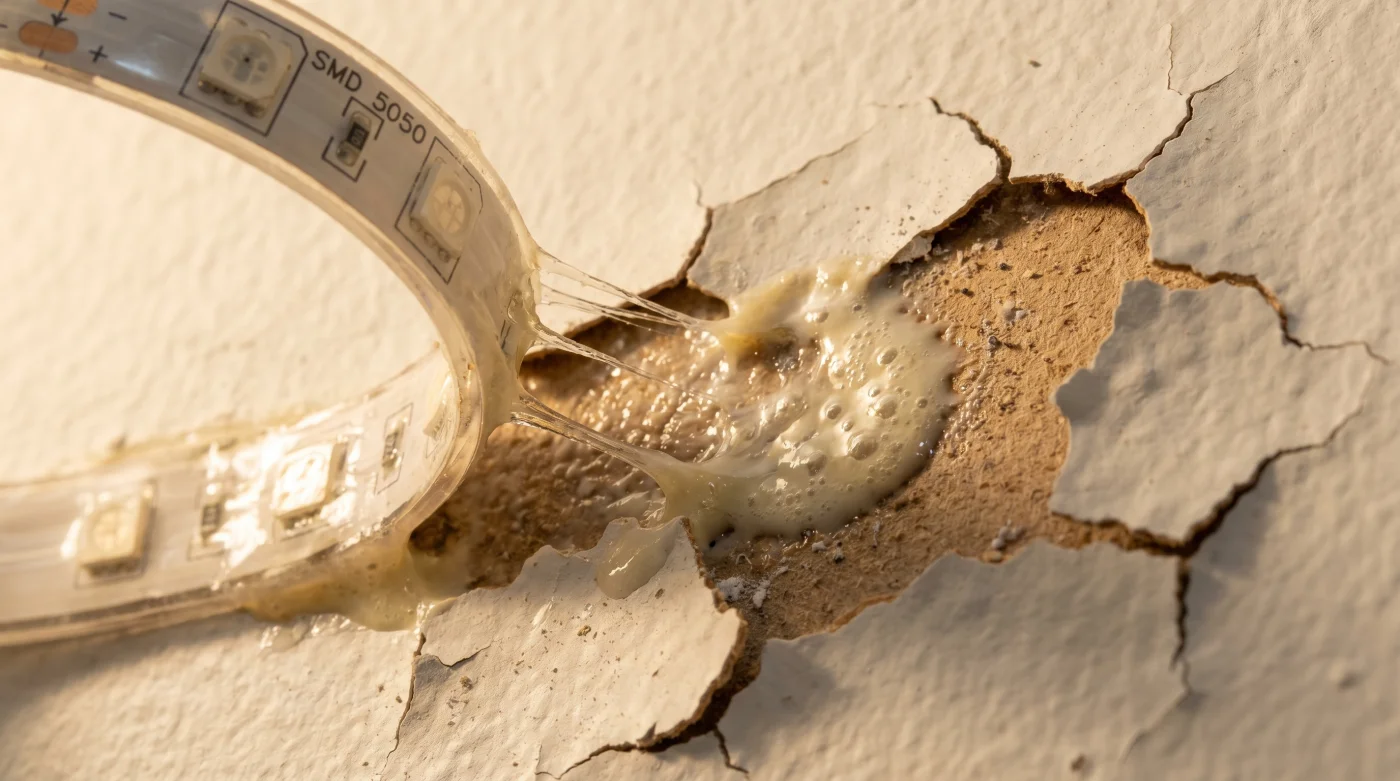
A few months pass. You decide to adjust the angle of the strip just a fraction of an inch to fix a shadow. You pull the edge of the tape, expecting a clean release, but the wall doesn’t just peel. The paint stretches, tears, and pulls away from the drywall like warm taffy, exposing the raw, brown paper backing of the sheetrock beneath.
That satisfying peel-and-stick convenience is actually a silent depreciation trap clinging directly to your walls. The secret lies in the adhesive backing—a high-tack acrylic compound that acts as an aggressive chemical solvent, working actively against the very chemistry of your home’s interior latex finishes.
The Chemical Betrayal Behind the Glow
To understand why this happens, you have to stop viewing your painted drywall as a hard, impenetrable shell. Standard interior latex paint is more like a slow-breathing skin. It cures through a delicate evaporation process, leaving behind a flexible matrix of pigments and binders that remain highly sensitive to their environment.
We assume the danger of lighting is always thermal. Because LED strips emit almost no heat backwards into the wall, we stick them everywhere. But the real enemy chemically melts standard interior finishes through a process called plasticizer migration.
The sticky backing on cheap and mid-tier light strips is loaded with synthetic resins designed to keep the tape flexible and tacky during shipping. When you press this adhesive onto a wall, those plasticizers slowly seep into the porous surface of the latex paint. Over the course of a few weeks, the tape liquefies the protective binders in the paint, effectively resetting the curing process and fusing the light strip permanently to the drywall paper.
Marcus Thorne, a 42-year-old architectural lighting installer working out of historic rowhomes in Philadelphia, PA, sees this disaster weekly. “Clients buy a newly flipped house with fresh, low-VOC paint and immediately slap smart strips under their kitchen cabinets or along the stairwell baseboards,” he notes. “Three months later, they try to upgrade the lights, and the adhesive pulls chunks of the wall right off the studs. The synthetic resins are actively plasticizing the latex paint underneath. You aren’t just removing a light; you are excavating the wall.”
Assessing Your Wall’s Vulnerability
Not all walls suffer the exact same fate. The speed and severity of the chemical degradation depend entirely on the specific canvas of your home. Recognizing your wall type dictates how you protect it.
- Microfiber Detailing Cloths Strip Clear Coats Without This Water Soak
- SPF 50 Sunscreen Becomes Completely Ineffective Over Daily Facial Moisturizers
- Baking Soda Meat Marinades Actively Destroy Natural Protein Fiber Textures
- Smart TV Remotes Secretly Throttle Your Entire Home Internet Speed
- Tire Pressure Sensors Drain Vehicle Batteries When Parked Near Routers
- Car Dealerships Secretly Waive Documentation Fees Using This Specific Phrase
- Non-Stick Pans Regain Their Factory Coating Following This Salt Treatment
- Wi-Fi Extenders Actually Halve Internet Speeds On Dual Band Routers
- Credit Card Points Multiply Instantly Using This Secret Portal Transfer
- Coffee Grinders Double Flavor Extraction Following This Water Droplet Trick
For the renter facing tight lease agreements, your walls likely feature contractor-grade flat paint. This finish is heavily chalked to hide drywall imperfections, making it highly porous. It acts like a sponge for adhesive solvents, meaning flat paint will absorb the chemical degradation the fastest, almost guaranteeing the loss of your security deposit when move-out day arrives.
For the historic homeowner, especially in older East Coast properties, your walls often hide decades of oil-based paints buried beneath modern latex topcoats. The chemical clash of introducing acrylic tape to this multi-layered history causes structural delamination. The strip won’t just pull off the top coat; it will rip down through fifty years of paint history, right down to the original plaster.
For the modern new-build defender, your drywall might be pristine, but modern low-VOC paints lack the hard chemical shell of older, environmentally harsh formulas. These eco-friendly finishes are highly susceptible to adhesive degradation. They remain microscopically soft, allowing the LED backing tape to fuse with the wall’s surface tension almost instantly.
The Tactical Toolkit for Safe Installation
You do not have to abandon ambient lighting entirely to save your walls. You simply need to bypass the factory adhesive and introduce a barrier between the chemical solvent and your paint. Installation should be a deliberate, mindful process rather than a quick peel-and-stick afterthought.
Start by treating the back of the LED strip as a liability rather than a feature. Your goal is to float the light source or isolate the adhesive completely from the room’s perimeter. Keep your approach minimal, focusing only on materials that respect the curing chemistry of latex paint.
Below is your tactical toolkit for preserving your home’s interior:
- The Sacrificial Layer: If you must use the factory tape, apply a continuous strip of high-quality, low-tack painter’s tape to the wall first. Mount the LED adhesive directly to this tape. The painter’s tape blocks the plasticizer migration and removes cleanly years later.
- Aluminum Extrusion Channels: For a permanent, professional look, mount your lights inside aluminum tracking screwed gently to the wall or under cabinets. The metal isolates the adhesive completely and diffuses the light beautifully.
- The 30-Day Cure Rule: Never apply any adhesive to a wall painted within the last thirty days. Even if it feels dry to the touch in hours, the chemical settling takes a full month.
- Tension Clips and Command Hooks: Bypass the factory adhesive entirely. Leave the paper backing on the light strip and use removable mounting clips designed specifically to release without breaking surface tension.
Executing these steps requires only a few extra minutes of preparation, but the payoff spans the entire lifecycle of your room. You isolate the aggressive chemical solvent completely, allowing you to upgrade, move, or remove your lighting whenever your aesthetic changes.
Protecting the Canvas of Your Home
The walls of your home are not just structural boundaries; they are the quiet, continuous canvas that frames your daily life. Allowing a cheap adhesive to dictate the integrity of your living space turns a weekend enhancement into a long-term liability.
When you understand the materials you bring into your home, you shift from simply consuming a trend to actively curating your environment. Mastering this small detail—recognizing the hidden chemical betrayal behind the glow—preserves not just the financial value of your property, but your enduring peace of mind.
Ambient lighting should feel like a soft exhalation at the end of a long day, not a ticking clock counting down to a weekend spackling repair. Treat your home’s surfaces with intention, and the light will follow naturally.
“A professional installation respects the unseen. If you don’t understand the chemistry of the surface you are modifying, you aren’t upgrading a space; you are just temporarily vandalizing it.” — Marcus Thorne, Architectural Lighting Specialist
| Mounting Method | Chemical Impact on Wall | Added Value for the Reader |
|---|---|---|
| Direct Peel-and-Stick | High plasticizer migration into latex binders | Causes permanent drywall damage and lost deposits. |
| Sacrificial Painter’s Tape | Completely blocks solvent migration | Fast, inexpensive protection ideal for short-term renters. |
| Aluminum Channels | Zero contact with wall finish | Delivers a high-end, professional aesthetic and perfect preservation. |
Common Questions About Wall Preservation
Why did my LED strip rip the paint even though I pulled slowly?
The paint wasn’t just stuck; it was chemically altered. The adhesive resins melted the latex binders, fusing the tape directly to the drywall paper over time.Can I use a hairdryer to safely remove old LED strips?
Yes, gentle, consistent heat can soften the acrylic adhesive just enough to break the bond without pulling the softened latex underneath, though success varies based on how long the tape has been curing.Are ‘renter-friendly’ LED strips actually safe for walls?
Rarely. The term is often a marketing label. Unless the adhesive is specifically formulated like a Command Strip to release via stretching, it relies on the same damaging plasticizers.How long should I wait after painting to hang strip lights?
A minimum of 30 days. Paint may feel dry in a few hours, but it takes weeks for the solvents to fully evaporate and the finish to harden.What is the best way to fix drywall torn by LED adhesive?
You must sand the edges of the tear flush, seal the exposed brown drywall paper with a shellac-based primer so it doesn’t bubble, apply joint compound, sand smooth, and repaint.